Reporting Center
Reporting Server refers to the Reporting Center setting used when configuring rules in Devices and Rules. The configured number corresponds to a server setting. For example, a reporting center value of 1 sends data to Server 1; a value of 1-2-3 sends data to Servers 1, 2, and 3 in parallel.
You can configure up to five reporting servers independently. Each server supports multiple industrial communication protocols.
MQTT Protocol
MQTT (Message Queuing Telemetry Transport) is a lightweight messaging protocol commonly used for IoT communication in low-bandwidth or unreliable network environments. It uses a publish/subscribe model. The NexusIM gateway acts as an MQTT client that publishes and subscribes to data through an MQTT broker.
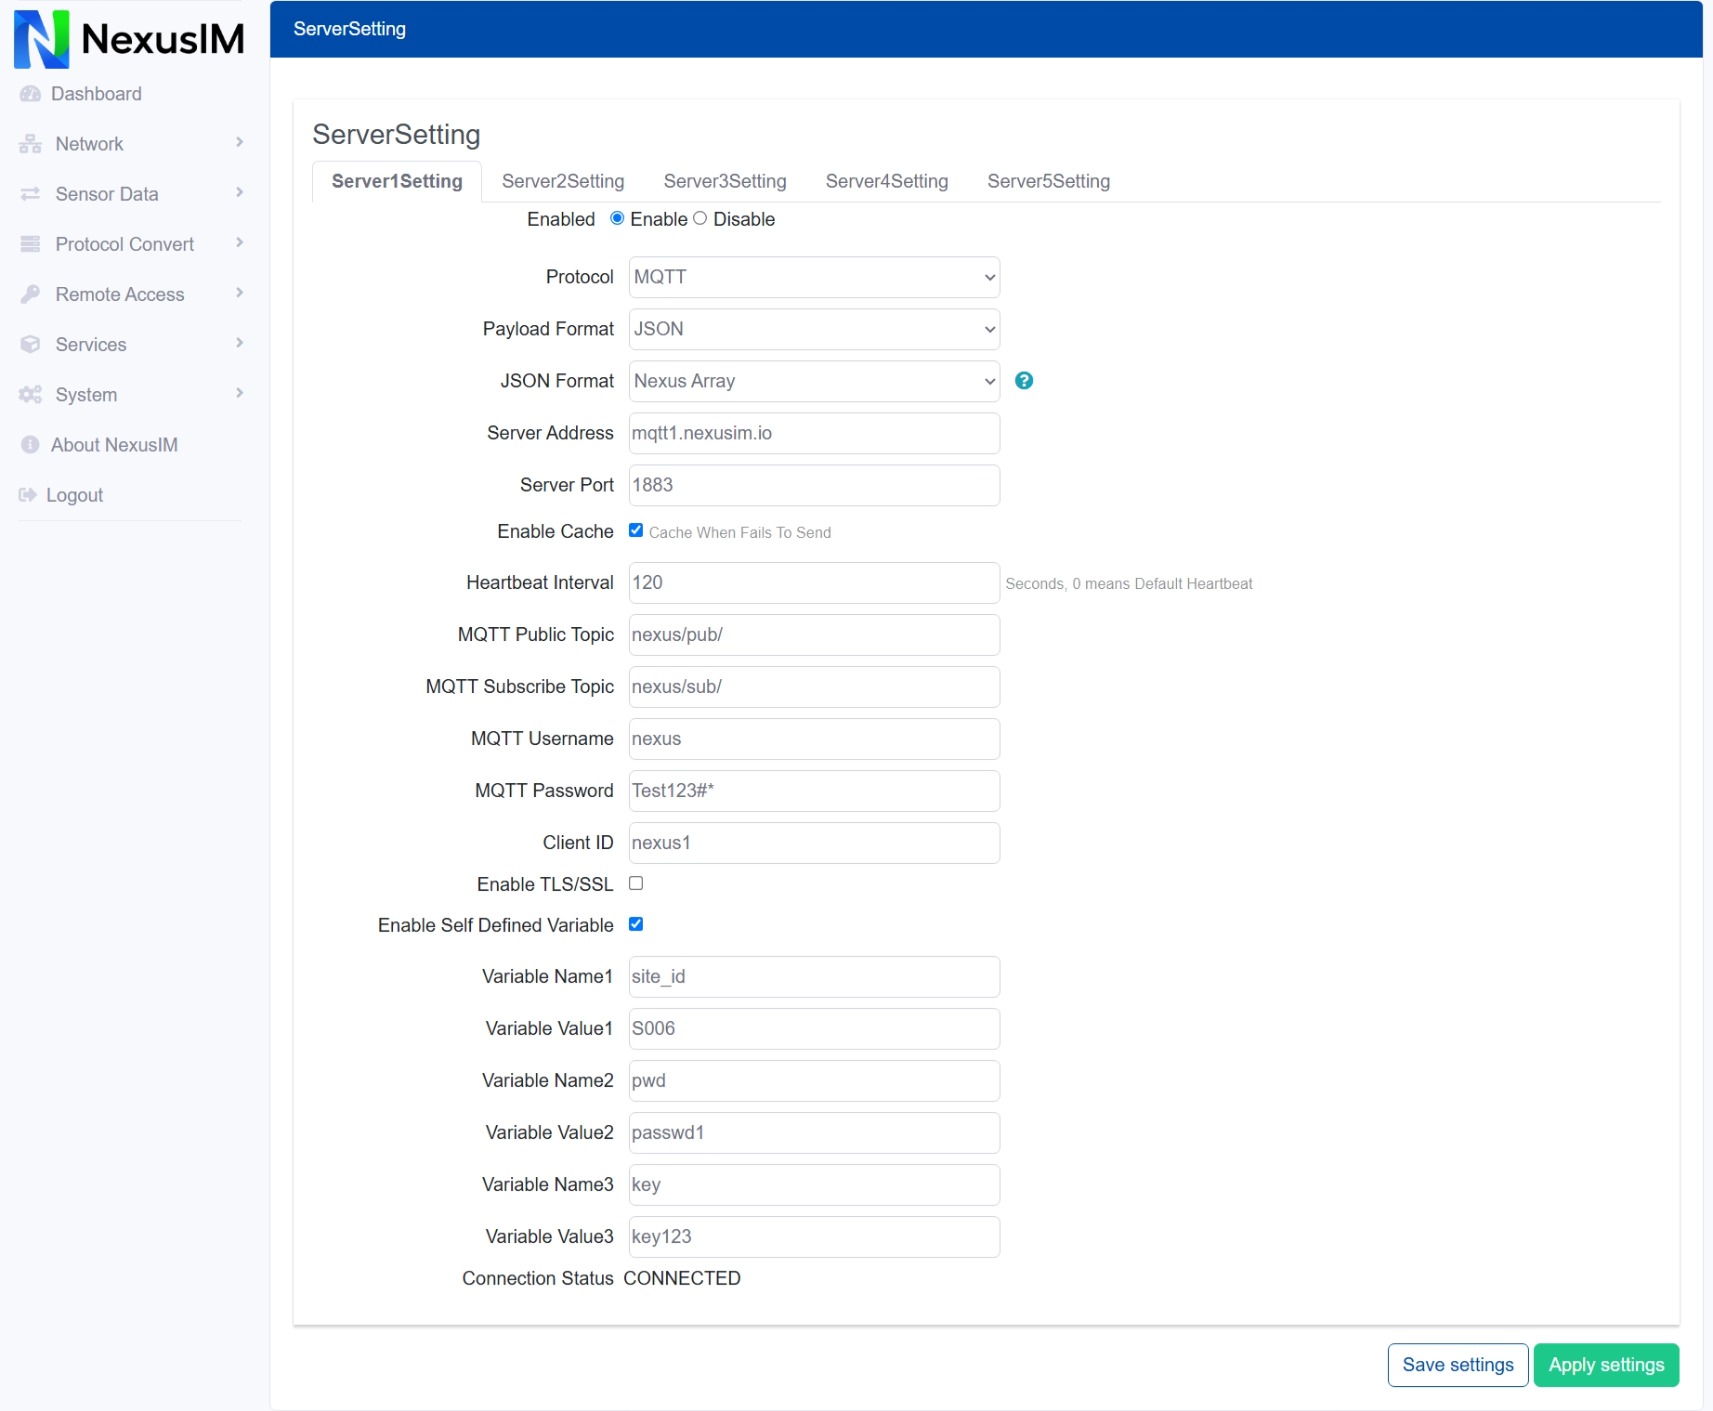
-
Specify a server to configure.
-
Enable or disable the server.
-
Select the communication protocol between the NexusIM gateway and the server. This example uses MQTT.
-
Select the payload encapsulation type:
JSONorTransparent.-
JSON format
Example:
{"ts": "<timestamp>","params": {"<tag1 from device rule>": "<tag1 value>","<tag2>": "<tag2 value>"}}{"ts": 1732876070827,"params": {"Humidity": 30.30,"Temperature": 27.80,"DO0_tag": 1}} -
Transparent format
Example:
"Humidity":30.20,"Temperature":27.70,"DO0_tag":1
-
-
Configure the server address.
-
Configure the server port.
-
Configure the heartbeat interval to keep the connection between the NexusIM gateway and server active.
-
Configure the MQTT publish topic.
-
Configure the MQTT subscribe topic.
-
Configure the MQTT username.
-
Configure the MQTT password.
-
Configure the MQTT client ID.
-
Enable TLS/SSL certification. Available certificate types are:
- CA-signed server certificate
- One-way certification, which requires a CA file
- Two-way certification, which requires a CA file and public and private keys
-
Enable self-defined variables to add payload parameters required by a cloud platform.
-
View the connection status.
Sparkplug B Protocol
Sparkplug B is a specification for stateful MQTT communication between IoT devices and applications. The NexusIM gateway acts as a Sparkplug B MQTT client that publishes and subscribes to data through an MQTT broker.
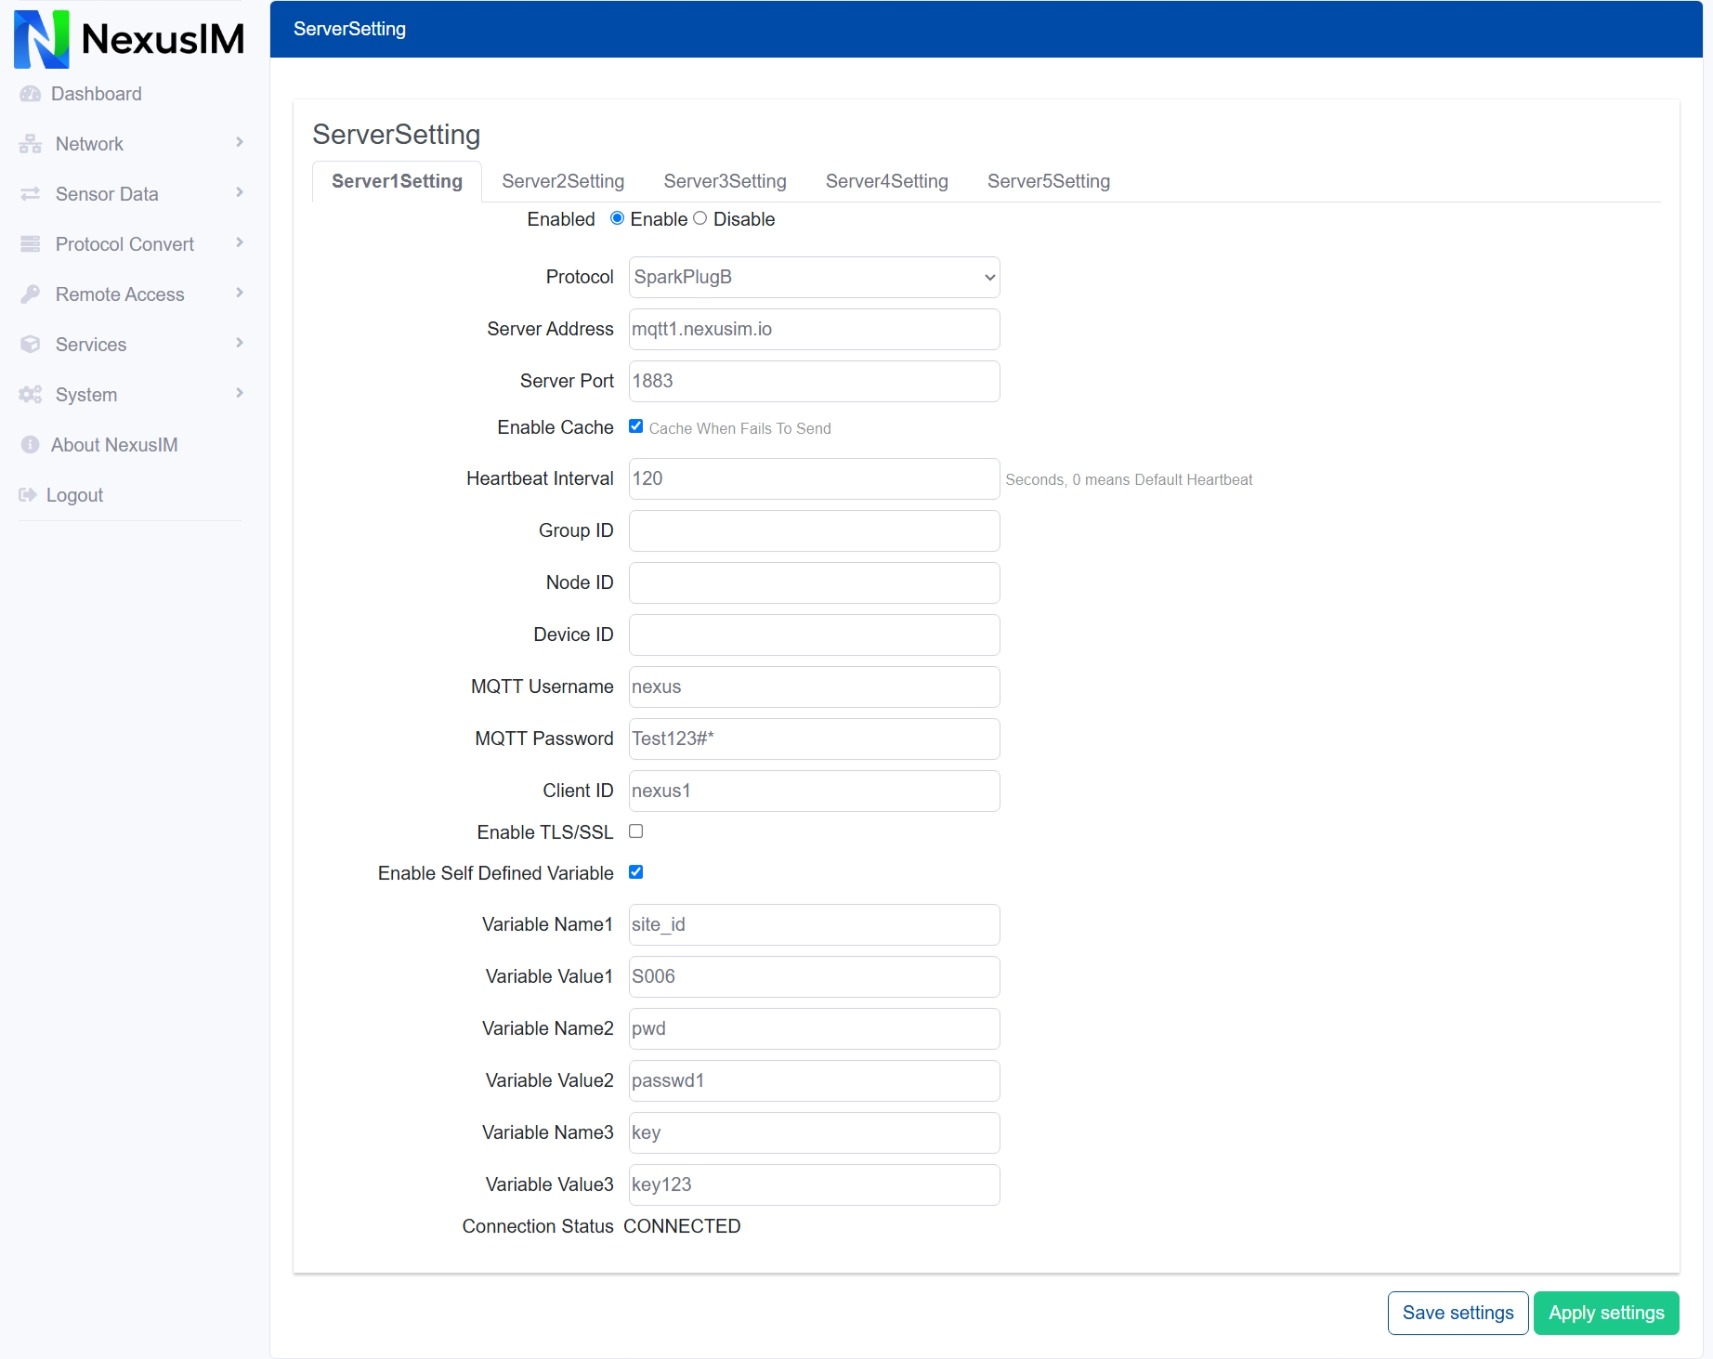
-
Specify a server to configure.
-
Enable or disable the server.
-
Select the communication protocol between the NexusIM gateway and the server. This example uses Sparkplug B.
-
Configure the server address.
-
Configure the server port.
-
Configure the heartbeat interval to keep the connection between the NexusIM gateway and server active.
-
Configure the Group ID.
-
Configure the Node ID.
-
Configure the Device ID.
-
Configure the MQTT username.
-
Configure the MQTT password.
-
Configure the MQTT client ID.
-
Enable TLS/SSL certification. Available certificate types are:
- CA-signed server certificate
- One-way certification, which requires a CA file
- Two-way certification, which requires a CA file and public and private keys
-
View the server connection status.
TCP Protocol
The NexusIM gateway acts as a TCP client that communicates with a TCP server.
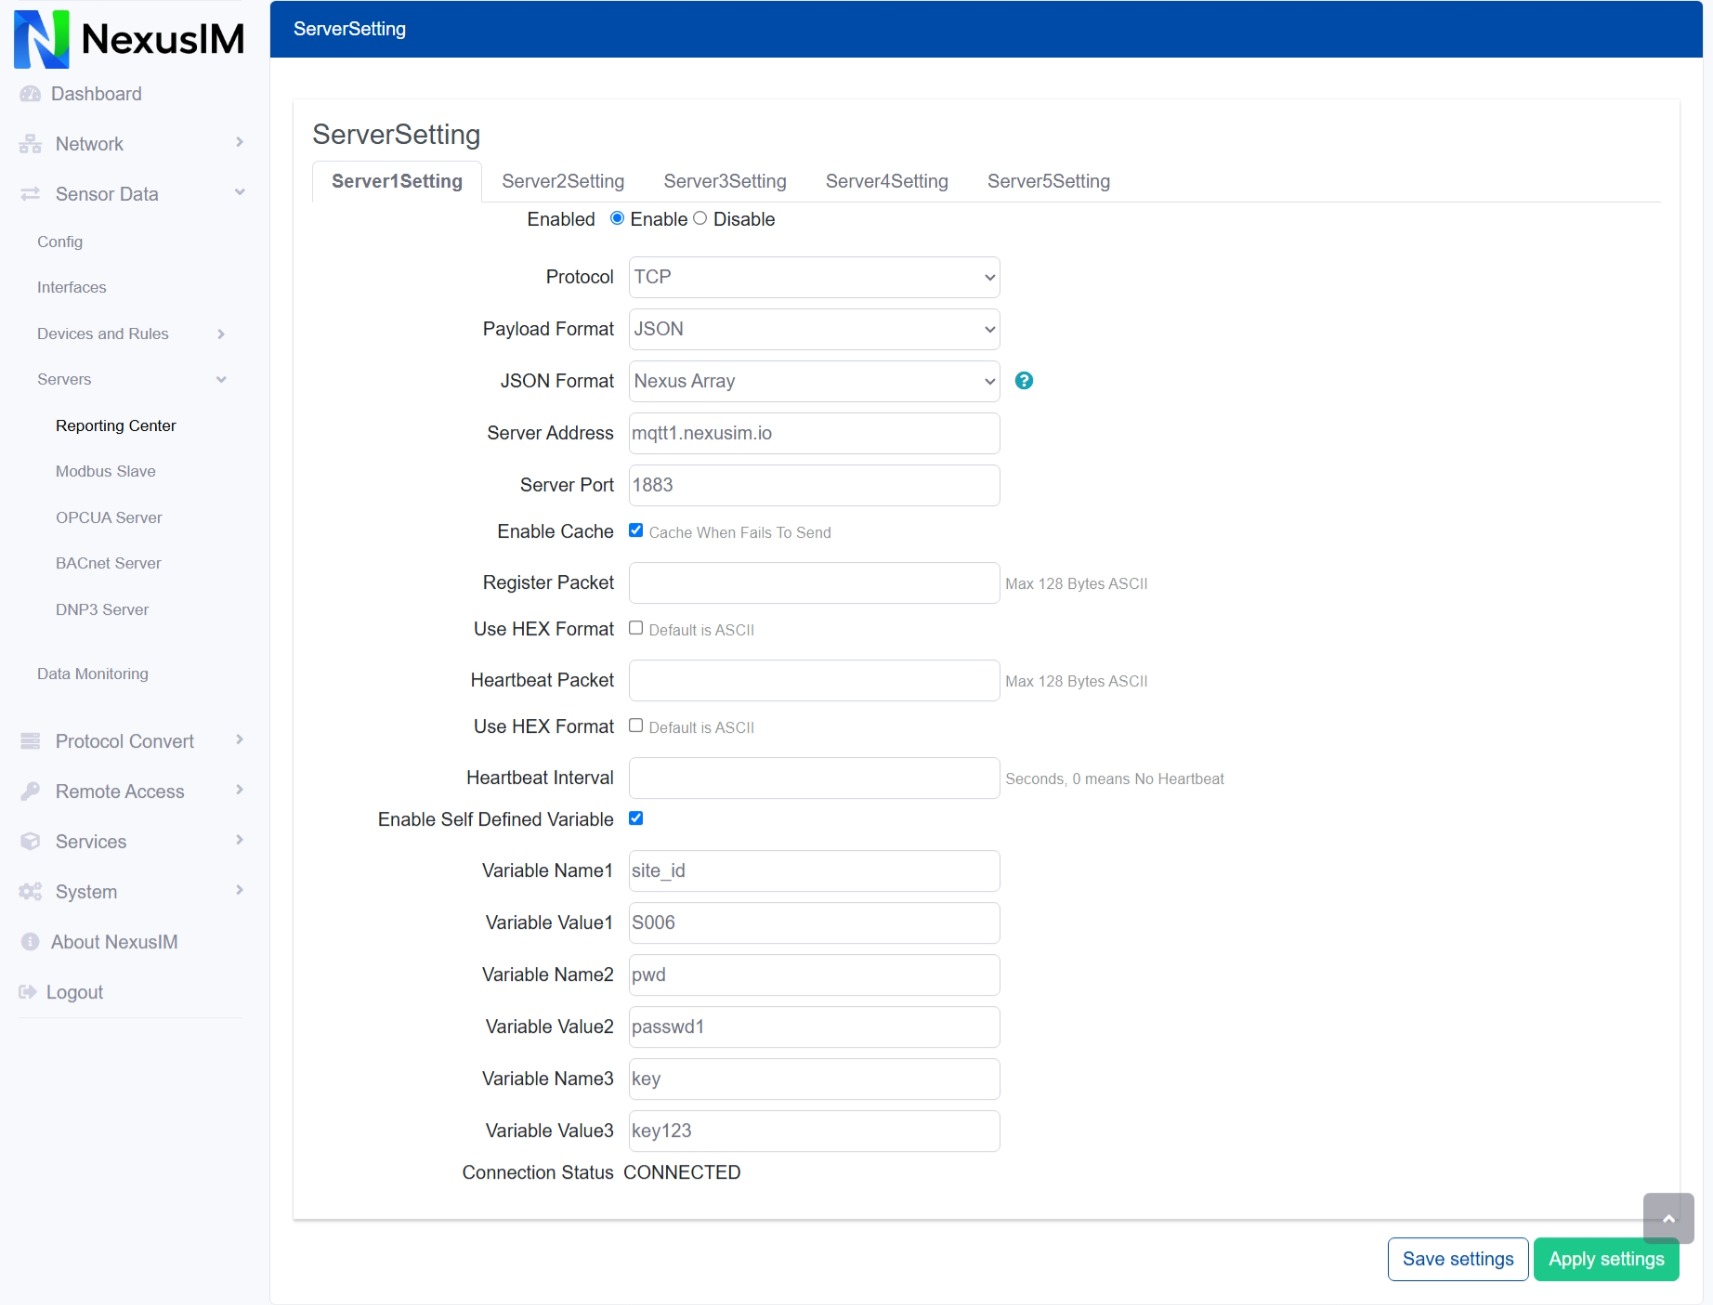
-
Specify a server to configure.
-
Enable or disable the server.
-
Select the communication protocol between the NexusIM gateway and the server. This example uses TCP.
-
Select the payload encapsulation type:
JSONorTransparent.-
JSON format
Example:
{"ts": "<timestamp>","params": {"<tag1 from device rule>": "<tag1 value>","<tag2>": "<tag2 value>"}}{"ts": 1732876070827,"params": {"Humidity": 30.30,"Temperature": 27.80,"DO0_tag": 1}} -
Transparent format
Example:
"Humidity":30.20,"Temperature":27.70,"DO0_tag":1
-
-
Configure the server address.
-
Configure the server port.
-
Configure the register packet.
-
Enable hexadecimal format for the register packet when required by the TCP server. The default format is ASCII.
-
Configure the heartbeat packet.
-
Enable hexadecimal format for the heartbeat packet when required by the TCP server. The default format is ASCII.
-
Configure the heartbeat interval to keep the connection between the NexusIM gateway and server active.
-
Enable self-defined variables to add payload parameters required by a cloud platform.
-
View the connection status.
UDP Protocol
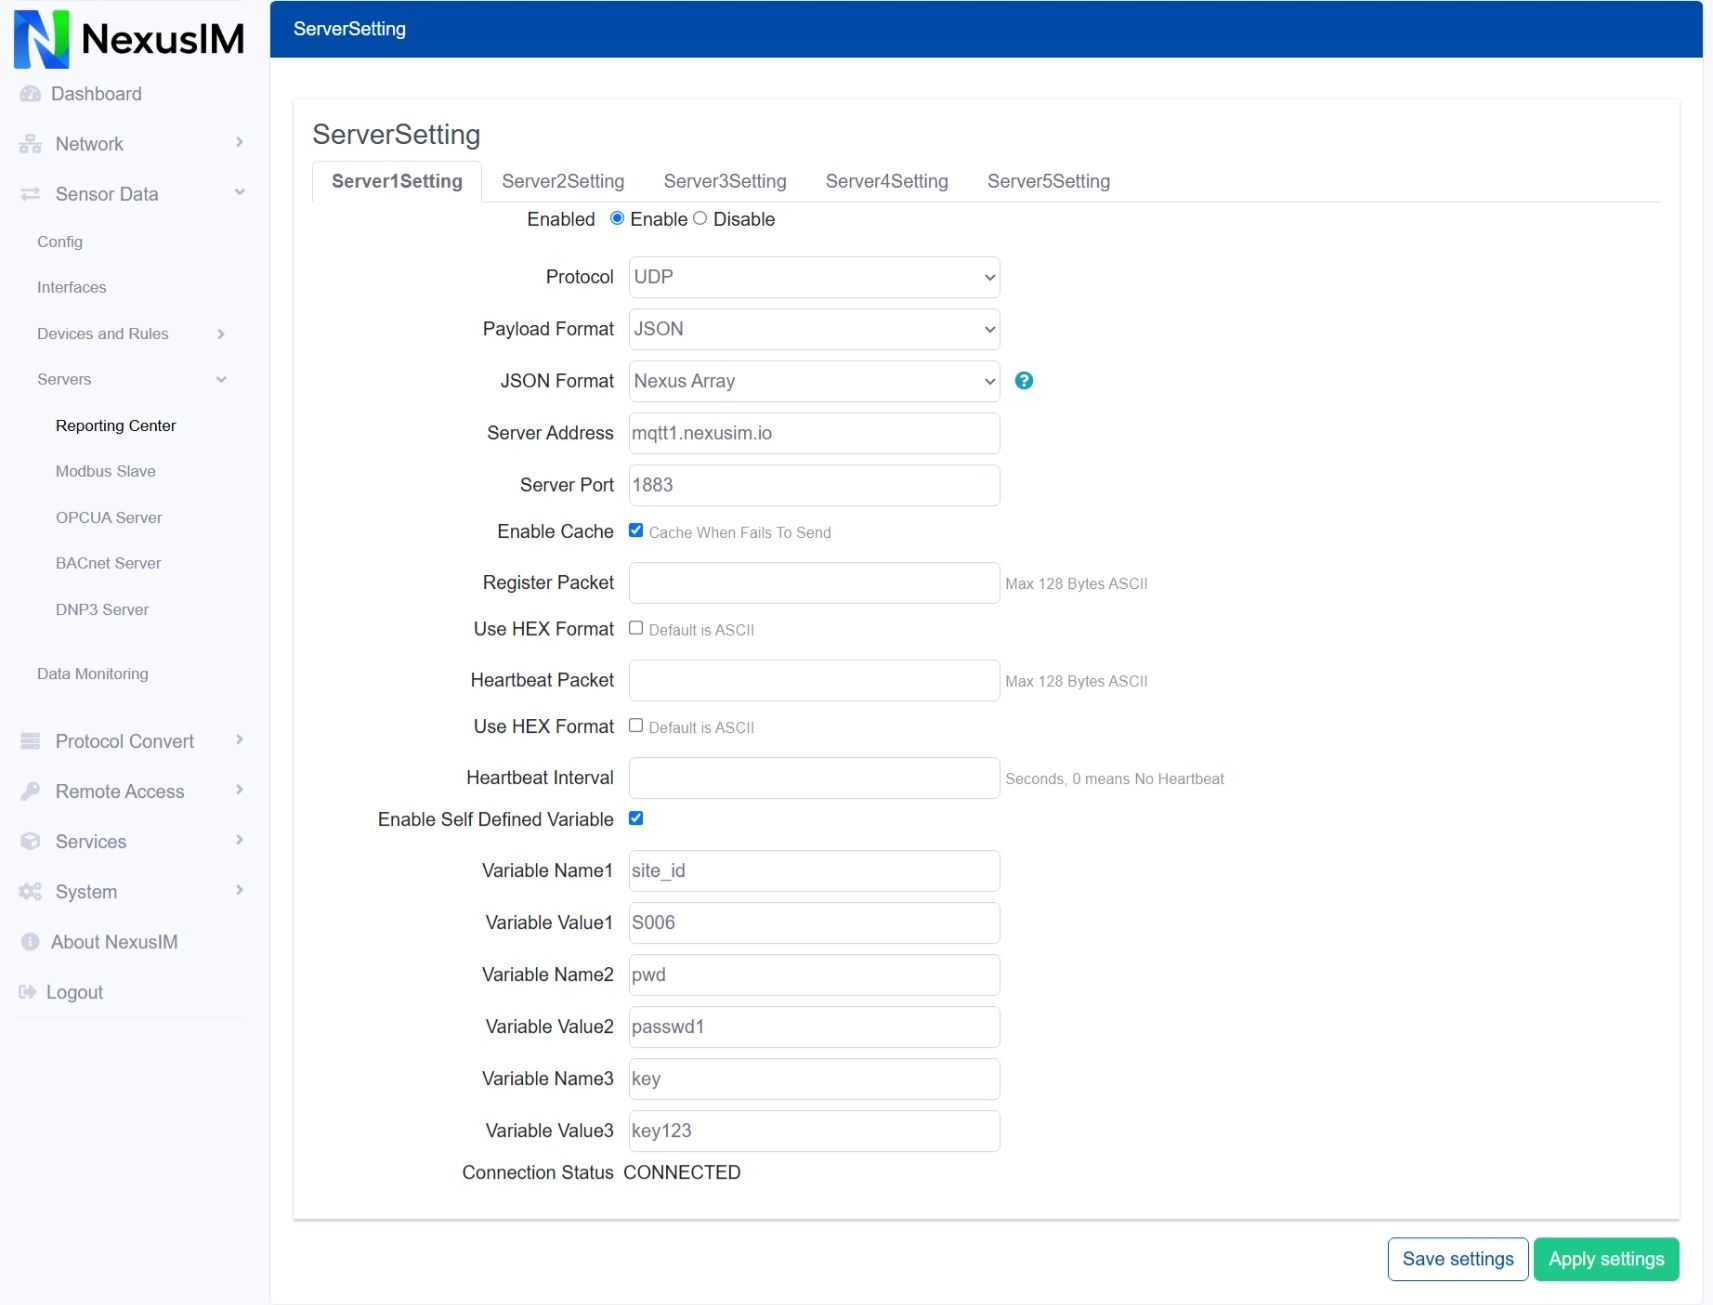
The NexusIM gateway uses UDP to communicate with a server. Refer to the TCP protocol section for related configuration guidance.
HTTP Protocol
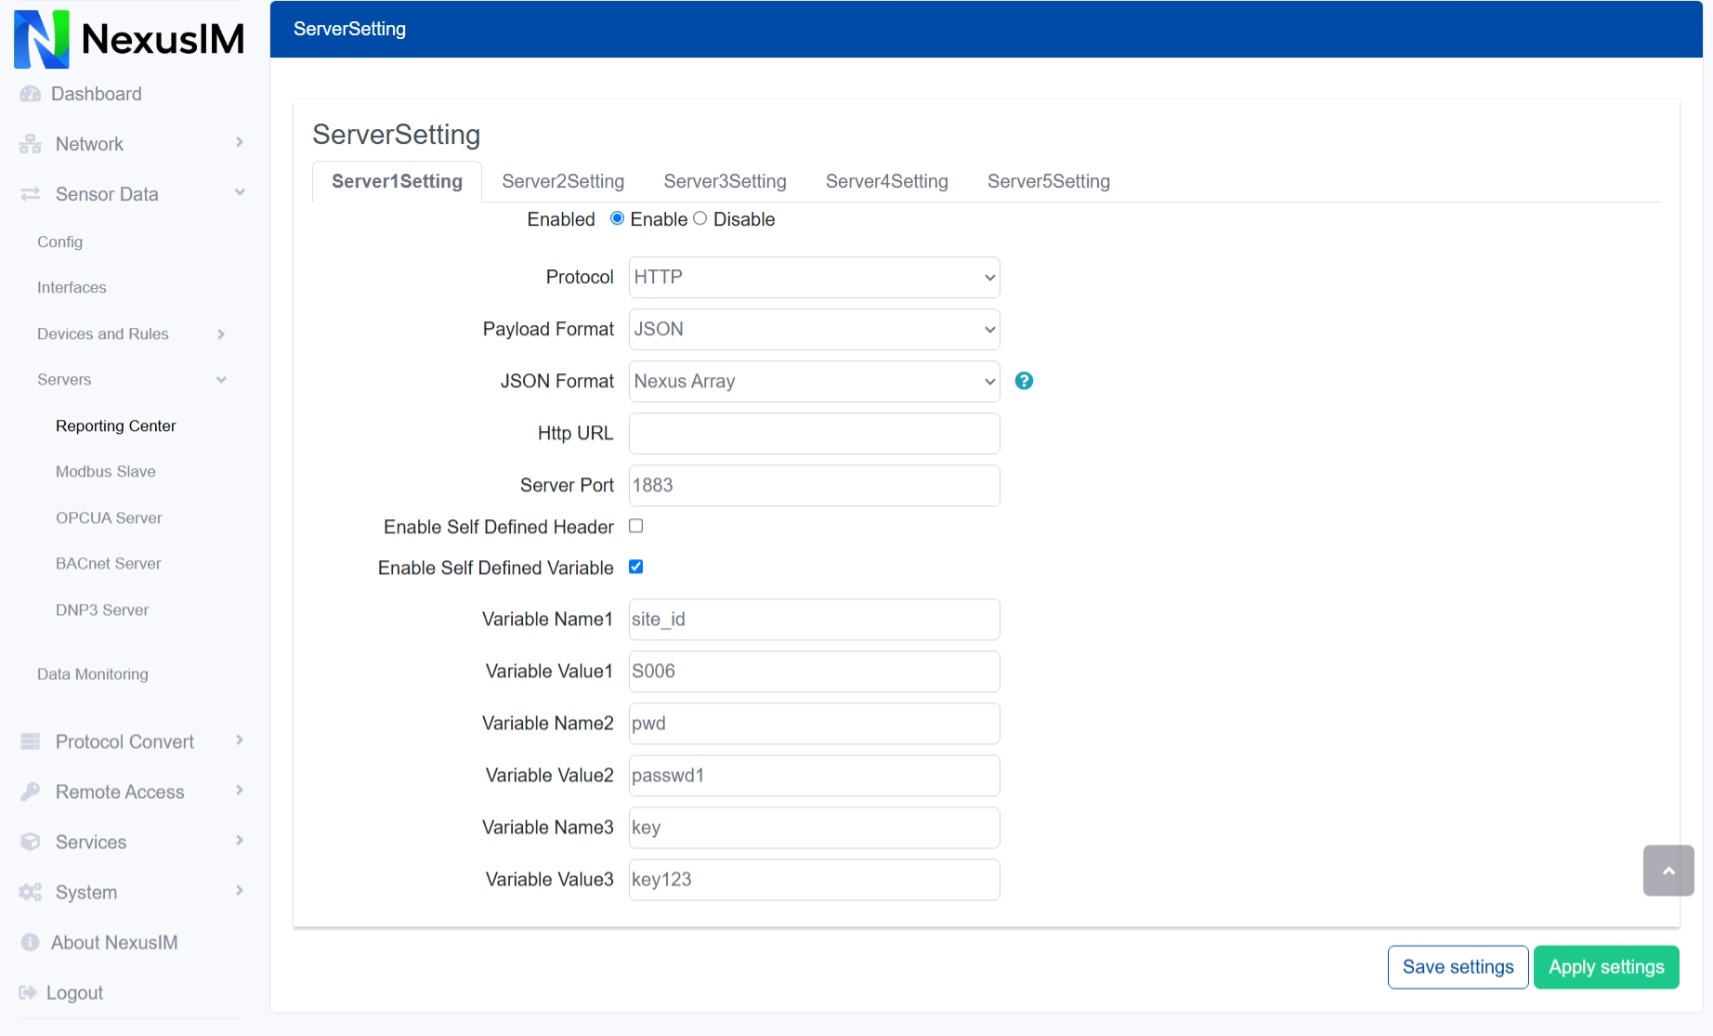
The NexusIM gateway sends HTTP POST requests to an HTTP server.
-
Specify a server to configure.
-
Enable or disable the server.
-
Select the communication protocol between the NexusIM gateway and the server. This example uses HTTP.
-
Select the payload encapsulation type:
JSONorTransparent.-
JSON format
Example:
{"ts": "<timestamp>","params": {"<tag1 from device rule>": "<tag1 value>","<tag2>": "<tag2 value>"}}{"ts": 1732876070827,"params": {"Humidity": 30.30,"Temperature": 27.80,"DO0_tag": 1}} -
Transparent format
Example:
"Humidity":30.20,"Temperature":27.70,"DO0_tag":1
-
-
Configure the HTTP URL.
-
Configure the server port.
-
Enable self-defined variables to add payload parameters required by a cloud platform.
The POST format example is:
POST / HTTP/1.1
Host: 10.0.0.17:8080
User-Agent: curl
Accept: */*
Content-Type: application/json
Content-Length: 92

{
  "ts": 1732882000675,
  "params": {
    "Humidity": 30.40,
    "Temperature": 28.00,
    "DO0_tag": 1
  }
}